GIS to GPS - Import of ESRI Shape Files
Datum and Projection
Layers Merging
Import of Navigation Data and/or other Attributes
Store Settings for Future Re-use
Upload into GPS
ESRI Shape Files are vector files used in GIS applications. They contain geographical data and optional attributes. Shape files can support point, line and area features. Each layer is stored separately. An ESRI shape file consists of main file (.SHP), an index file (.SHX) and attributes dBASE table (.DBF).
Use the main menu / File / Open or Merge function to import an ESRI shape file and convert it into the Mapwel map. Then you can upload it into the GPS unit or export into other format (Advanced version only).
As the shape files are primarily not designed to use with GPS units and attributes of objects are specified by user, Mapwel software cannot assign the shape file attributes (data) to the map object properties like Name, Comment, Type, etc. automatically. User is prompted to assign available shape file data to the map objects.
Because layers are stored in a separate shape files, it is necessary to Merge (with use of main menu>File>Merge command) all shape files to create complete map in Mapwel. Mapwel stores whole map in a single MPW file.
Loading of each SHP file involves following steps:
- Coordinate System. Selection of projection and datum used for representation of geographical data in SHP file.
- Types. Assignment of SHP attributes to types (like polyline type) used by Mapwel and Garmin GPS.
- Enumerated Parameters. Assignment of SHP attributes to object parameters with limited number of allowed values (like "Oneway" road parameter) in Mapwel.
- Parameters. Assignment of other SHP attributes representing name, comment, street name, phone number and other data to Mapwel data structures.
- Format. Formatting of object name, comment. Selection of elevation units, etc.
Only the first step (selection of coordinate system) is obligatory. Next steps are optional, but they are useful to transfer information from attributes in a shapefile to objects in Mapwel. This helps to reduce or completely eliminate editing of map in Mapwel software.
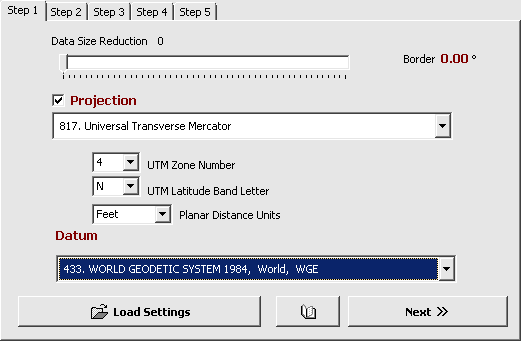
Step 1 - Selection of projection and datum
Use the first tab in the SHP open file dialog to select coordinate system of the SHP file. This is the most important step in loading of the shapefile. You have to know coordinate system of the SHP file. If chosen coordinate system is not the right one, map will be imported improperly. This information is often stored in *.PRJ text file enclosed to the shapefiles. If *.PRJ file is in the same folder as *.SHP file and has the same name, Mapwel tries to read the georeference data automatically.
UTM Zone Number, UTM Latitude Band Letter and Planar Distance Units are controls for definition of additional information for UTM system. UTM Latitude band letter affects only selection of the hemisphere (northern or southern) when converting coordinates from UTM to Lat/Lon. Therefore, you can obtain the same Lat/Lon coordinates for various band letters.
Use Data Size Reduction control to decrease the number of imported vertices (in case of area and line objects). If imported data contain too many vertices, displaying of map on the GPS can be very slow. In such a case, reduce the size of imported data to speed-up the map displaying. Reduction of vertices decreases also precision of the map elements definition. The highest available accuracy of the map elements uploaded into the Garmin GPS is approximately ±1.2 m. Accuracy of imported data should be lower or equal to this value to optimize the speed of map displaying and data size.
Border is an empty space added around the map. Imported map may be clipped to bounding rectangle of all objects. Set Border to non-zero value if you need to add empty space around the map. Click left or right mouse button on the value to increase/decrease it, or click on 'Border' label to set value by keyboard.
Click the Next>> button when you are finished with selection of coordinate system and data size reduction.
Please note: Load Settings button can be used to restore settings previously saved to disc. This allows to re-use settings if you import the same file multiple times. Use this option if the shapefile is updated in other GIS software and imported repeatedly to Mapwel for compilation into the GPS file format.
Step 2 - Assignment of attributes to Mapwel types
If any of the SHP file attributes defines the type of objects, you can use this tab to create attribute-to-Mapwel type conversion table.
Mapwel cannot recognize meaning of SHP attributes automatically, as they may contain any type of information. Definition of conversion table allows user to assign proper type to imported objects.
You can skip this step if:
-
there is no attribute that defines type of objects
-
some attribute already contains Garmin object types
-
you do not wish to assign type to objects.
Use Import roads as routable option to convert polylines that represent roads to Routable road objects in Mapwel software. Other polylines (like rivers, power line, etc.) are converted to common Line object. It is possible to make such conversion later in the work area of Mapwel as well. However, next tabs allow to assign parameters essential for routing only when this option is checked.
If Detect intersection nodes option is checked, program will automatically detect and mark intersections of routable roads. These intersection nodes are essential for compilation of routable map. Detection of intersection nodes can be done also later, with use of main menu > Routing > Detect Intersections command.

Follow these steps to create conversion table:
A) Select attribute that defines the object types.
B) Click on the first line of the first column in conversion table. Select attribute value from the pop-up menu that appears.

C) Click on the second column in the same line. Select type of object from the pop-up menu. This type will be assigned to all imported objects that have attribute ROADCLASS set to value Primary.
D) Use Add button to create as many items in the table as neccessary. Define all attribute value - object type pairs.
When finished, click the Next>> button.
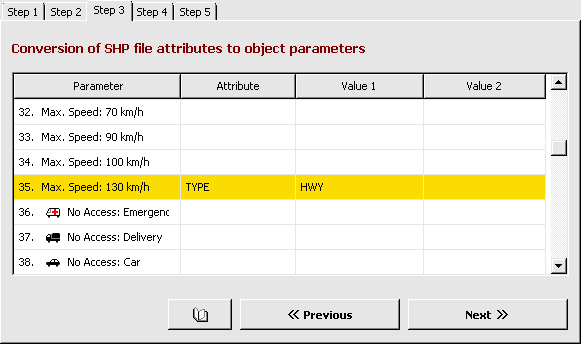
Step 3 - Assignment of attributes to Mapwel types
You can use this tab to create 'attribute value-to-Mapwel parameter value' conversion table. This table contains only parameters with finite number of possible values, for example 'Oneway' parameter, which can be only TRUE (checked) or FALSE (unchecked). Shapefile attribute value is mapped to the Mapwel parameter value.
The first column contains such parameters and all their possible values, for example: Max. Speed:10 km/h, Max. Speed: 20 km/h, etc. It is not possible to edit this column. However, user can select shapefile attribute into the next column and its value to 3rd or 4th column. In below example Max. Speed is set to 130 km/h in Mapwel for all objects that have TYPE attribute set to HWY in the shapefile.
Selection of attribute or its value is easy: just click on respective table cell and select required item from the pop-up menu that appears. You should define the attribute first and the value(s) next, because values list is generated according to selected attribute. It is not necessary to fill-in all cells in the table. Set only those lines of table that you need to.
Shapefile can contain any attributes with any values and this table allows to map them onto parameters of individual objects in Mapwel software. There are two columns (Value 1 and Value 2) of attribute values for case that you need to map two attribute values to the same Mapwel parameter value. For example, you may need to map TYPE: TRAIL and TYPE: WALK from shapefile to the same Mapwel parameter value Max. Speed: 10 km/h. Note: speed levels are set to km/h or mi/h according to units selected in main menu > Edit > Preferences.
Step 4 - Assignment of other SHP attributes to Mapwel data structures
The fourth tab allows to assign attributes with virtually infinite number of values (like text labels, for example) to Mapwel object.
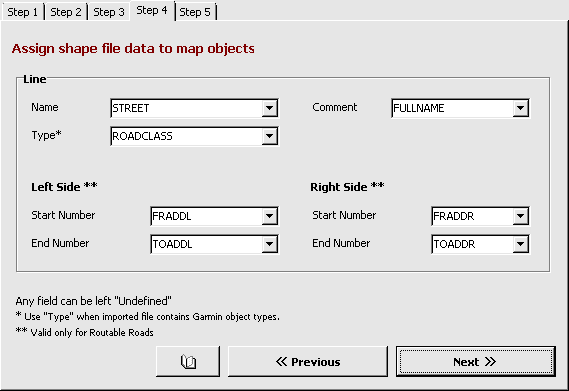
If there are attributes, which define the name, comment or other Mapwel-compatible data like street name or phone number, use this tab to assign them to the respective Mapwel variables.
If imported file has an attribute that conforms the Garmin polygon, polyline and point indexing system, assign this attribute to the Type variable. This condition is usually satisfied by shape files originally created for GPSmapper software.
If type conversion table was defined in Step 2, Type is automatically set to the respective attribute.
Left Side and Right Side controls allow to define house numbering along the street for the Routable Road objects. Type of numbering (None, Even, Odd or All) can be set on the previous tab.
Step 5 - Fields formatting
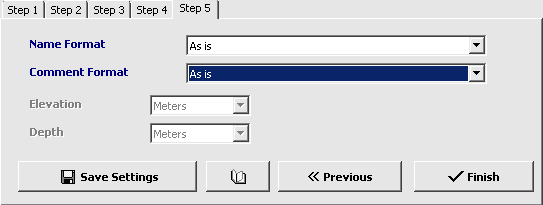
Click the Save Settings button to store all settings (from all previous steps) to disc to re-use them in case of repeated import of the same shapefile in the future.
Click the Finish button when the last step is finished.
In this case, imported map has four types of lines: 3 types as defined in the Step 2 and the 4th (default) type for rest of the lines, which were left with the undefined type.
Map can now be uploaded to GPS or converted to GPS compatible *.IMG file format.
For specific tutorial on how to import and convert parcel map, please refer to How to create parcel map from ESRI shapefile chapter.