OpenStreetMap Download
Conversion for Garmin GPS
Mapwel contains built-in tool for download of free map files from OpenStreetMap servers and their conversion into file format compatible with Garmin GPS devices.
This tool is accessible via main menu > Tools > Download Free Maps command. It allows to download large freeware maps and converts them into routable files for GPS with just few clicks of mouse. Please note: this tool works only if your computer is connected to internet. Routing is supported only by Advanced version of Mapwel software. This tool is supposed to be used with Advanced version of Mapwel. Maps downloaded with unregistered or Basic version of Mapwel are usable in Garmin GPS, but they are marked with 'Trial Map' labels and they are not routable.
OpenStreetMap OSM files can be downloaded individually from respective url. Mapwel software allows conversion of these files into routable maps for Garmin GPS units. However, downloading and processing of large number of maps can be very time-demanding process, because each map must be cropped and aligned with other maps to ensure seamless navigation. The downloader tool allows to select large area on the world map, split it into individual maps and convert all maps as a map set for Garmin GPS.
To prevent confusion when using terms "map" and "map set" frequently, this tool uses term "tile" for individual map and "set" for set of map.
Set
Internal data structure of map file and GPS rendering engine limit the size of individual maps (tiles). Therefore, large maps are always composed of smaller maps. These small maps are organized into so called "sets". Maps in the set share the same color palette, user-defined icons and few other parameters. Set Preferred Language of OSM Labels to ensure that proper text labels will be loaded from the OSM files. OSM file may contain text labels in various languages (Russian, French, English, etc.). The difference between Characters Encoding and Preferred Language is that Preferred Language defines which labels will be loaded and Characters Encoding defines which font will be used both in Mapwel software and in Garmin GPS to display those labels.
How to Construct Set of Tiles
Your map set can contain one or multiple tile. Each tile in the set must have its own bounding rectangle (current version supports only tiles of rectangular shape). Press SHIFT key and draw rectangle to define the tile boundary manually. There are several ways of how to create set of multiple tiles. However, the first step common to all of them is to define the Set data - for example the name, family, copyright, the storage folder, characters encoding, etc. If your language uses special characters (other than used in English language), make sure to select proper characters encoding, because routines for automatic labeling of map tiles use this setting. Methods for tiles creation are:
1. The easiest method is to draw one large rectangle (covering for example whole state or country) and use Automatic Split command from the pop-up menu that appears when you right-click on map in the list. This command splits large rectangle into number of small rectangles according to density of population. It also assigns names to most rectangles (names are taken from included cities, suburbs and villages). If there are any rectangles located outside the area of interest (outside the country), you can select and delete them (to reduce amount of downloaded data) or leave them as they are.
2. More advanced (recommended) method is to use Lasso to draw irregular shape that includes the area of interest. Then use Lasso > Generate Tiles command from the pop-up menu to create rectangular tiles that cover selected area. Tiles generation is adaptive, like in approach 1. The difference is that you do not need to delete tiles outside the area of interest. The lasso polygon does not need to be drawn very precisely. Usually, you need to draw polygon with only few lines. Following pictures illustrate this method:
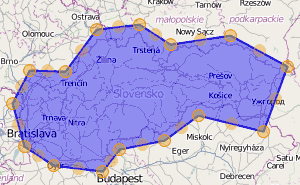
Draw polygon with lasso tool. Area of interest must lay inside of the polygon.
Polygon does not need to be very detailed.
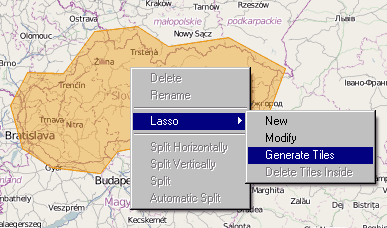
Use pop-up menu > Lasso > Generate Tiles command.
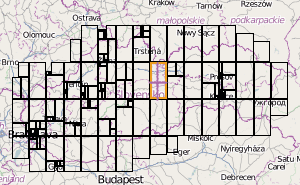
Tiles cover the polygon area and they are generated
according to density of population (higher density=smaller tiles).
3. Another method is to draw one or several large rectangles and split them manually by setting the split point and use of Split Vertically or Split Horizontally command.
4. The most laborious method is to draw all small rectangles manually. Setting of appropriate grid can help to align individual rectangles one to the another.
You can combine any of above methods to create such coverage of area of interest as needed.
Controls Layout
- Controls are organized to several tabs, according to their meaning. Use the "Set" tab to define parameters of whole map set like name, draw order, etc.
- Controls on "Connection" tab allows to change internet addresses where program searches services needed for maps downloading. Unless these services change their location, you do not need to modify these data.
- Main menu allows to access commands for work with map set and individual tiles. Most of these commands are also accessible via pop-up menu.
- Area of individual tile (map) can be defined by depressing the SHIFT key and drawing rectangular bounding box.
- Drawing of the tile bounding box respects the grid selected from this combo box. The grid helps to align individual tiles one to another seamlessly. Grid lines are visible on the map preview if you zoom-in sufficiently.
- Bounding coordinates of selected tile are displayed on this panel. Clicking left and right mouse button on coordinate moves respective edge of tile. This can be used to adjust the size of the tile. Each move of the tile edge is aligned to actually selected grid. You can change grid size anytime to adjust step of the movement.
- List of tiles in the set. When download starts, this panel displays download log instead.
- The tile that is too large for processing is displayed with red color. You have to split such tile either manually or automatically until it is small enough.
- Tiles achieved by automatic splitting of large tile. Program splits parent tile according to density of population and names the new tiles automatically. You can use Rename command to change name of each tile, if needed. These names appear in the map list of GPS.
- Selected tile. Cross of magenta color marks the split lines. If you decide to split selected tile manually, then the parent tile splits along the split lines. To change position of the split lines, depress the ALT key and click inside of selected tile. Split lines are aligned to selected grid.
- Coordinates of the split lines. Click on these coordinates moves split lines within the tile, using the grid lines distance as a step for movement.
- Lasso marker can be used to define area of irregular shape. This area can be turned into tiles or used as a mask for erasure of multiple tiles at once.
- When all tiles are drawn and the set is saved to disc, use Download button to start download of the map data. This process can last few seconds or several hours, according to map size and speed of your internet connection.
Parameters of Set
The Set tab contains all essentials parameters to define set of map. They include traffic side, maps transparency, draw order, family ID., characters encoding (for languages with special characters) etc.
Object Filtering
Data downloaded from OpenStreetMap contain many objects which make map very detailed. However, too much detail can make map large in size and hard to read, especially while driving. 'Include Objects' box on the Set tab contains options to filter some objects from the map. Filtering makes resulting map in GPS smaller and faster to render. Also, map is more legible. Typical objects that you might want to filter are shapes of buildings, or icons like bus stops and road crossings. Option 'address' refers to icons with house numbers and/or street name.
Result
The final result is routable map in GPS, with turn-by-turn voice navigation. However, there are also some other files created as well. Downloaded data are saved in Mapwel's MPW format (one MPW file for each Tile) into chosen folder. This file format allows to edit map data in Mapwel software. Optionally, MPW files are compiled into the same number of IMG files compatible with Garmin GPS. This option is turned on by default. When downloading is finished, user is asked whether individual IMG files should be merged together (and upload to GPS right away) or not. If they are merged together, result is one overall IMG file that contains the whole downloaded map set. It doesn't matter whether you upload individual IMG files or single overall IMG file to Garmin GPS (individual files are merged together before actual uploading anyway).