Loading Raster Image into GPS
Automatic Vectorization
(Sample file in *.IMG format is stored in MAPWEL>FILES folder.)
This function can be accessed via main menu > Image > Automatic Vectorization. It allows to create map for GPS device from satellite images or scans automatically, within a few minutes. It is intended for use in situation when there are no vector maps available of the area of interest, and drawing of precise vector map is not efficient either because of lack of time or limited use of the map.
In fact, most of the Garmin units do not allow to load raster image into GPS and use it as a map. This function automatically vectorizes raster image and creates vector file compatible with GPS. Autovectorized maps contain thousands of small color spots and are large is size and slow to render on GPS, therefore.
Note: If you have Oregon, Dakota, Colorado, GPSMAP 62, GPSMAP 78, or other GPS compatible with Garmin Custom Maps, use main menu > Image > Export to Calibrated KMZ command instead. This approach produces much better results, but is available only for few GPS models.
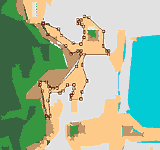
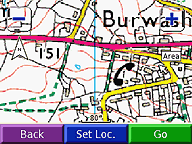
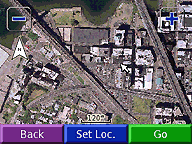
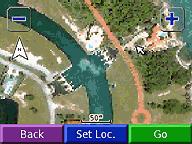
Objects
automatically vectorized from raster image.
Map consists of large number of polygons.
Colors are derived from raster and included into "User
defined styles"
for optional manual tuning and/or transfer to other map file.
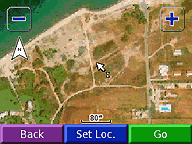
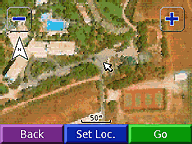
Examples of autovectorized maps in GPS
Pros: almost "one-click" process to create ready-to-use GPS map. You can create map like above examples in a few minutes. Auto-vectorized map can be combined with waypoints, tracks, manually drawn objects or other map data (like merged shapefiles, etc.)
Cons: GPS must support user defined styles (most of new units support them). Auto-vectorized map file is larger than normal map file and its rendering in GPS is slower. Auto-vectorized map does not allow to search objects. Objects do not have names, hints and other attributes. In other words, this kind of map is for viewing only.
Technical notes
Number of auto-vectorized maps can be loaded into GPS at once. Auto-vectorized maps can be exported into IMG format and combined with any other GPS maps. Current version of Mapwel software supports max. 86 colors for autovectorization.
Assign different Map Set Data to all auto-vectorized maps you create. This ensures displaying of map with correct colors in the GPS. GPS uses the same color palette for all maps in a map set. Therefore, maps with different palettes are not displayed correctly if they have the same Map Set Data.
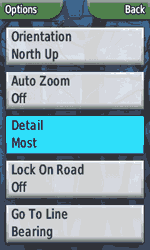
Warning: you have to set map detail in GPS to 'Most' (default value is 'Normal') to see autovectorized map in full detail. Otherwise, only a large colored squares are visible. Autovectorized map is supposed to be rendered in full detail at zoom 800 m and closer.
Map setup menu with Detail option.
This is screenshot from Colorado 300, but each Garmin GPS has some menu for setting this option.
Make sure to set it to 'Most'.
How to use auto-vectorization
-
Use any image editing software to resample and crop raster image. Reduce number of colors to fit into range supported by Mapwel (up to 86). Save image into GIF, PNG or BMP format (do not use JPG because it does not preserve exact color palette).
-
Import image into Mapwel software. If number of colors exceeds max. allowed number, Mapwel automatically reduces number of colors during autovectorization.
-
Georeference the map. You can skip this step if you import OziExplorer calibrated image.
-
Use main menu>Image>Automatic Vectorization function to create map.