User Defined Styles
(Custom Symbols)
Basic set of Garmin polygons, lines and icons is focused mostly on navigation and recreational maps. It is not sufficient for applications like geology, forestry and electrical engineering that require large number of fill patterns and specialized icons. Fortunately, most of the new Garmin GPS units support user defined styles* for filled areas (polygons), lines and icons (points). Mapwel software includes editor of these styles and library of predefined styles. Editor allows user to create custom fill patterns, colors, line styles and point icons (cities, map features, points of interest and exits). New styles are saved with map in Mapwel *.MPW format.

![]()
![]()
User defined styles for polygon, line and point of interest.
* Support of user defined styles may require upgrade of the GPS firmware. If map with user defined styles is loaded to Garmin GPS that does not support them, objects are displayed with use of the GPS built-in styles, i.e. user defined styles are not used.
Warning: if you create map for loading into several types of Garmin GPS units, make sure that all of them support user defined styles, before actual creation of the map!
Map Set Data
Assign different Map Set Data (main menu > File > Properties > ID tab) to all your maps if they contain user defined styles. This ensures displaying of map with correct colors in the GPS. GPS uses the same color palette for all maps in a map set. Therefore, maps with different palettes are not displayed correctly if they have the same Map Set Data.
Built-in Editor
Editor of user styles can be accessed with Mapwel main menu > Objects > User Defined Styles, or with pop-up menu in the Properties window.
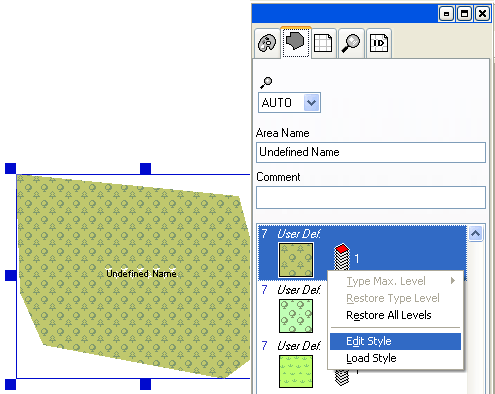
The new styles can be saved as a separate files to the disk, for future use in other maps, or exported into *.txt format for use with other mapping software.
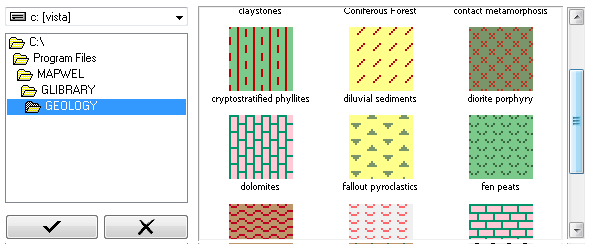
Library of predefined styles.
Custom Polygons
Editor of user styles contains separate tabs (1) for editing of areas, lines and points. User defined areas (polygons) are bitmaps of 32x32 pixels size. Only 2 colors (foreground and background) per pixel are allowed. User can define one pair of colors for GPS daytime mode (13) and another pair for the nighttime mode (14). Use of the background colors is optional. If they are not used, the area will be transparent.
It is possible to define name of the style (displayed by some GPS units) in up to 4 languages. Use table (15) to type-in the name of the style. use right mouse button click on the Language column to choose from available languages.
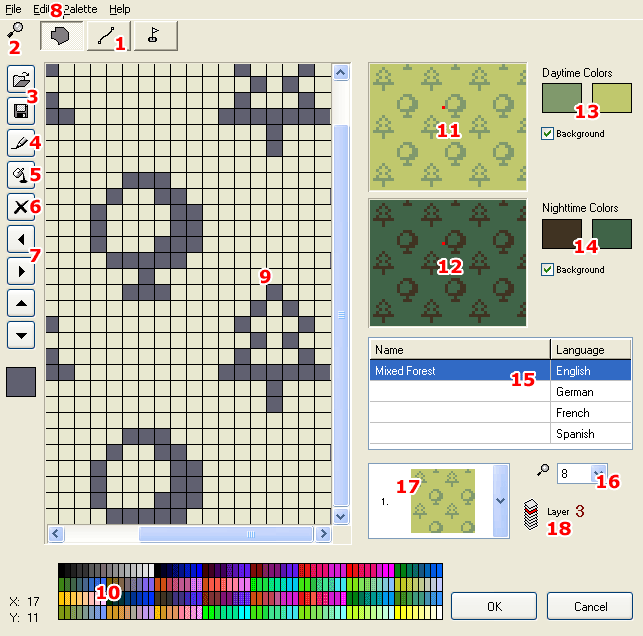
Zoom level (16) control allows to define maximum zoom level at which the object using this style will be visible in the GPS.
Layer specifies order in which object will drawn by the GPS. By assignment of proper layers user can define which object will be drawn on top of the other objects.
Please see below list for description of the rest of the controls.
- Tabs with editors for areas, lines and points.
- Editor zoom control. It is also possible to use mouse wheel to zoom the work area in and out.
- Open and Save buttons. Use these buttons (or menu>File) to open or save styles from/to library.
- Pencil tool.
- Paint Bucket tool.
- Clear style button.
- Scroll buttons.
- Menu.
- Work area.
- Color palette. Some GPS units (GPSmap 60CSx, for example) use fixed 256-colors palette. Use default colors from this palette to ensure that your styles will look the same on the PC and GPS. Use left and right mouse button click to copy color from palette to Day colors controls. Use SHIFT, CTRL or ALT + left and right mouse button click to copy color from palette to Night colors controls.
- Style preview in daytime colors.
- Style preview in nighttime colors.
- Daytime foreground and background colors. If Background check box is unchecked, the area will be transparent.
- Nighttime foreground and background colors. If Background check box is unchecked, the area will be transparent.
- Table with optional style names in various languages.
- Maximum zoom level for the style.
- Combo box with available user defined styles.
- Layer (see above). Use left and right mouse button click on the number to increase/decrease the value. Click on the caption to use other ways of inserting the value.
Custom Lines
Lines editor is available on the second tab. Line styles are defined as either the bitmap of 32 pixels width and variable height, or line with set pen and border width. In both cases, line uses only two colors, which can be defined separately for the daytime and nighttime modes.
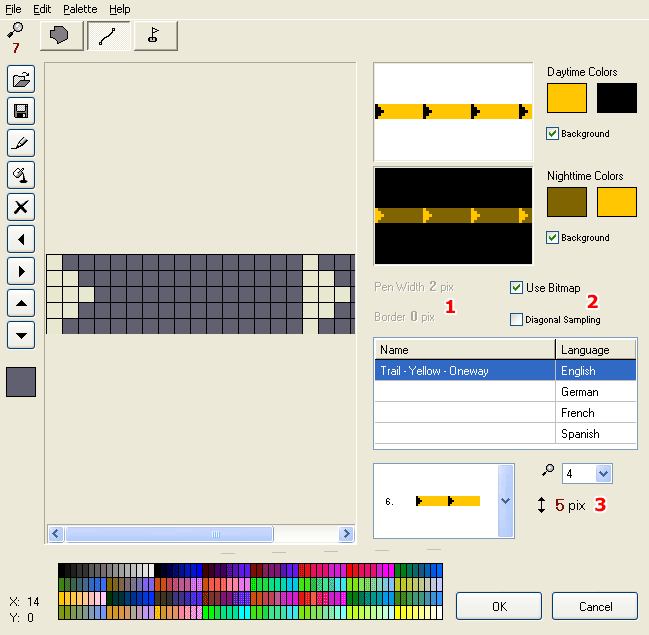
Please see below list for description of the rest of the controls.
- Pen and Border width for lines that are not defined by bitmap.
- Use Bitmap control for switching on/off the bitmap mode. When displayed on the GPS, bitmap is rendered with either horizontal or vertical sampling (according to angle of the line), unless the Diagonal Sampling is enabled. In such case, rendering uses also the diagonal sampling, but it does not look good for all bitmaps.
- Height of the bitmap. Use left and right mouse button click on the number to increase/decrease the value. Click on the icon to use other ways of inserting the value.
Custom Point Icons
Unlike areas and lines that use only 2 color bitmaps, point styles use multicolored icons with optional transparent background. Point icons are of variable size (up to 24x24 pixels), with up to 255 colors. Use left mouse button when drawing the icon to fill pixels with color chosen from the palette. Use right mouse button to erase pixels (transparent background). See next chapter (Menu) for useful command that help with drawing of the icons.
Please note: Left mouse click on the palette selects the drawing color. Right click opens the color mixer that allows to define a new color. However, some GPS units (GPSmap 60CSx, for example) use fixed 256-colors palette and they are not capable of displaying more colors. In such case, all colors are mapped to the default palette.
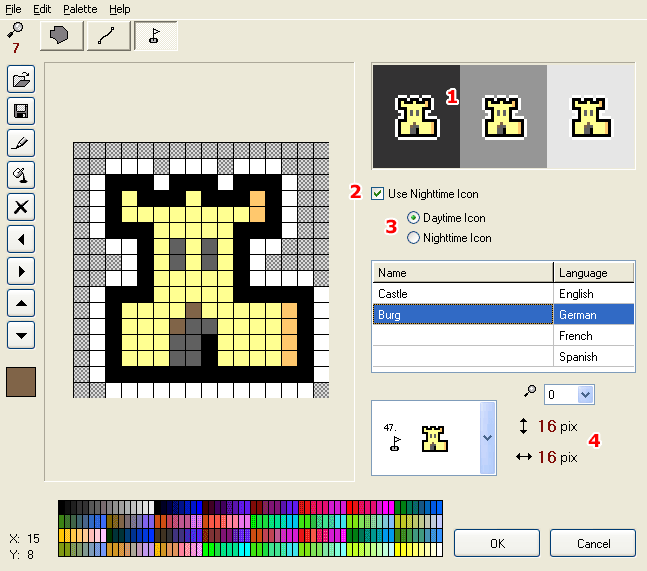
Please see below list for description of the rest of the controls.
- Preview of icon on various backgrounds.
- Control to enable/disable nighttime icon.
- Controls to switch between editing of daytime and nighttime icon.
- Width and Height of the bitmap. Use left and right mouse button click on the number to increase/decrease the value. Click on the icon to use other ways of inserting the value.
Main Menu
Menu > Edit contains some useful commands that make creation of the styles easier:
Derive Night Colors from the Day Colors command generates automatic night colors for edited area or line style.
Replace Colors with Closest Matching Colors in the Palette command replaces all colors in edited style with the most similar colors from the palette.
Add Border command creates thin border of selected color around the point icon (see above castle icon example).
Copy Daytime Icon to Nighttime Icon and Copy Nighttime Icon to Daytime Icon commands create copy of the respective icon.
Create Nighttime Icon from Daytime Icon command generates the nighttime icon, which is a darker copy of the daytime icon.
Use menu>File>Save Whole Set and menu>File>Open Whole Set commands to copy all styles from one map to another if you want them to use the same set of styles.